Residential Gutter Guard Installation Guide for Homeowners
Residential Gutter Guard Installation Guide for Homeowners

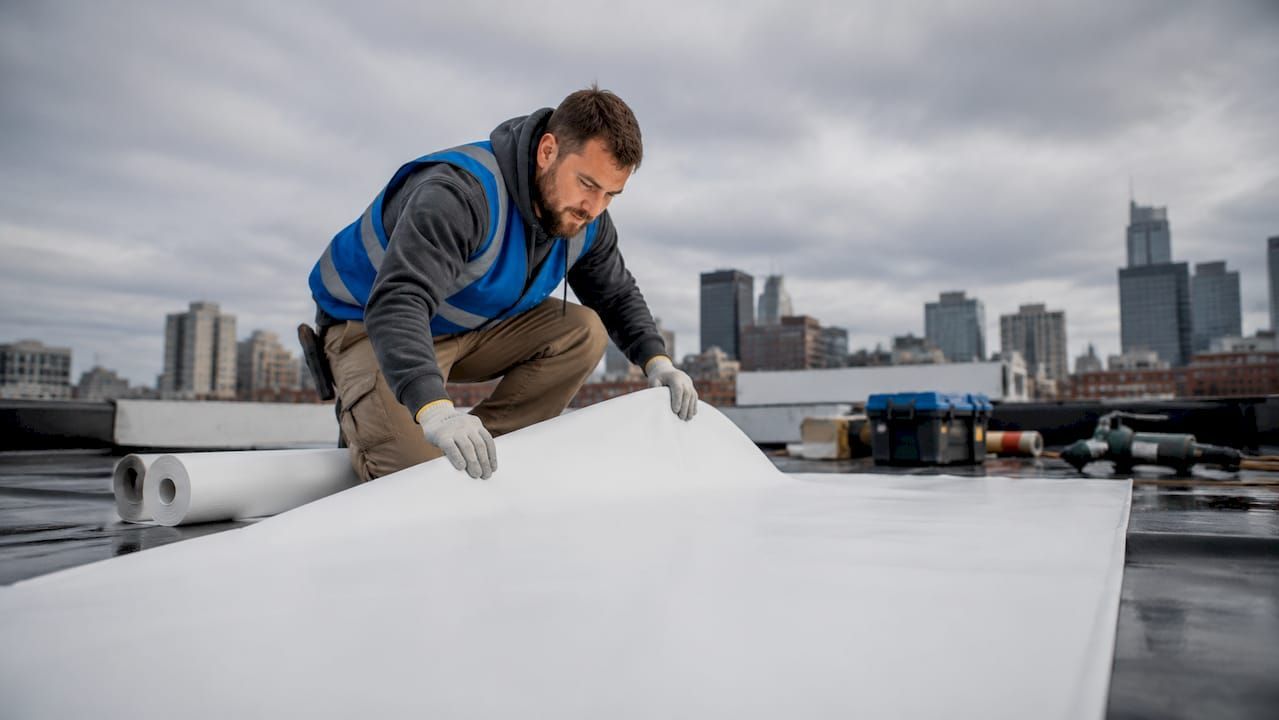
Residential gutter guard installation is the process of securing protective covers over your gutters to block debris, improve drainage, and reduce how often you need to clean them. Done right, gutter guards extend the life of your gutters and protect your home's foundation, fascia, and siding from water damage. This guide walks you through every step of a proper gutter protection system installation, from selecting the right product to fastening the final section. You will also find expert tips on avoiding the mistakes that cost homeowners the most time and money.
What tools and materials do you need for residential gutter guard installation?
The right tools make the difference between a clean, lasting installation and one that fails after the first heavy rain. Before you start, gather everything listed below so you are not climbing up and down your ladder repeatedly.
Tools and safety gear:
- Extension ladder (rated for your weight plus tools)
- Work gloves and safety glasses
- Tin snips or a utility knife for cutting guards to length
- Cordless drill with a screwdriver bit
- Self-tapping screws (stainless steel preferred)
- Measuring tape
- Garden hose for flushing downspouts
Gutter guard types and what they require:
| Guard Type | Cutting Required | Fastening Method |
|---|---|---|
| Screen guards | Yes, tin snips | Screws or clips |
| Micro-mesh guards | Yes, tin snips | Screws or snap-fit |
| Foam inserts | Yes, utility knife | Press-fit, no screws |
| Brush inserts | Yes, utility knife | Press-fit, no screws |
Most residential homes need roughly 200 linear feet of coverage, and most guard products come in standard 3- or 4-foot sections. That means you will typically need 50–65 sections for a full installation. Knowing this upfront helps you buy the right quantity and avoid mid-project trips to the hardware store.
Pro Tip: Buy 10% more material than your linear footage calculation suggests. Cutting errors and corner trims waste more product than most homeowners expect.
How do you properly prepare your gutters before installing gutter guards?
Preparation is the most skipped step in a DIY gutter guard installation, and it is the one that causes the most failures. Think of it like painting a wall. No matter how good your paint is, it will peel if the surface is dirty or damaged underneath.
Follow these steps before placing a single guard section:
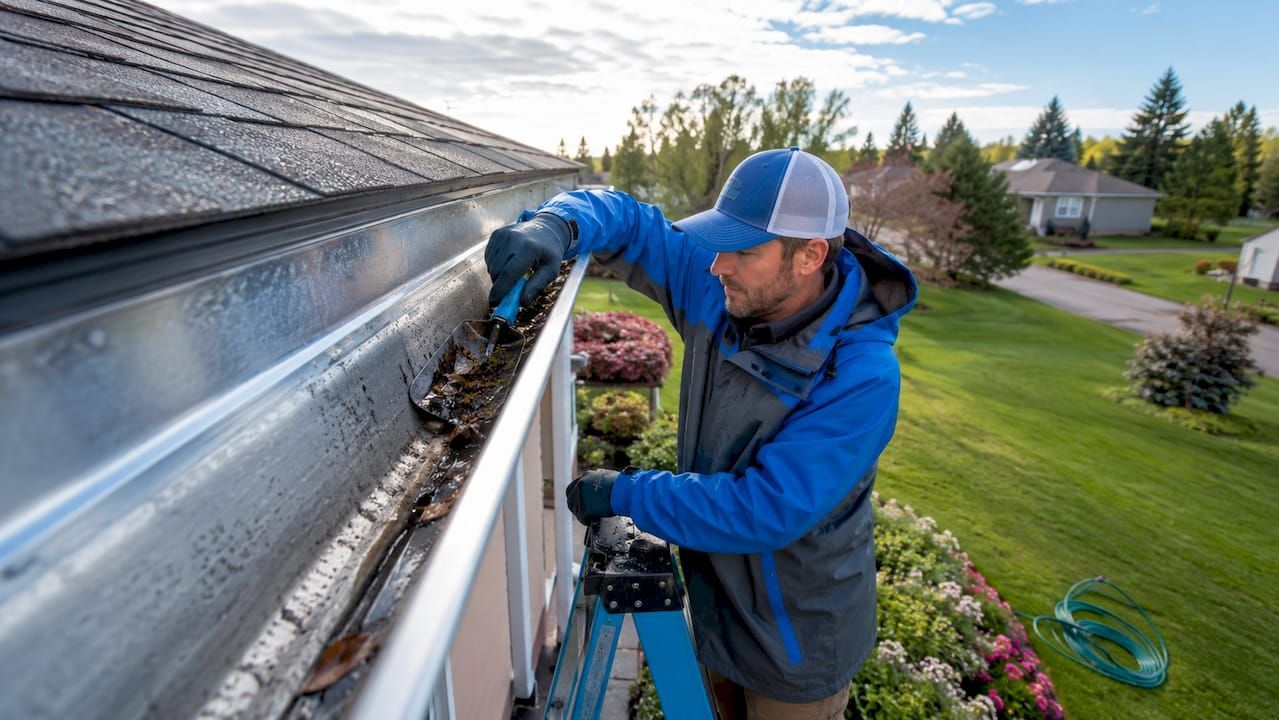
- Clear all debris. Put on gloves and remove leaves, twigs, and sediment by hand. Use a stiff brush or gutter scoop to get into corners.
- Flush the downspouts. Run a garden hose through each downspout to confirm water flows freely. A blocked downspout means guards will only trap water above the clog.
- Inspect gutter hangers. Check every hanger for looseness or rust. Tighten hanger screws before installing guards because once guards are in place, hangers become nearly impossible to reach or service.
- Verify gutter slope. Your gutters should slope toward downspouts at roughly 1/4 inch per 10 feet. Pour water in the far end and watch where it flows. Gutter guards act as filters , not fixes. If your gutters drain poorly now, guards will only hide the problem.
- Check the drip edge and shingles. Look for lifted, cracked, or brittle shingles near the gutter line. Note how your drip edge sits. Some guard designs slide under shingles, and you need to know your roof's condition before attempting that.
- Test water flow one final time. Run the hose along the full gutter length and confirm water reaches the downspout without pooling. Only proceed once this test passes.
Pro Tip: If you find sagging gutters during this inspection, re-secure the hangers with longer screws into the fascia board before moving forward. A sagging gutter will cause guards to sit unevenly and channel water over the edge instead of through the downspout.
Checking your roof drip edge and shingles at this stage also protects you from accidentally voiding your roofing warranty during installation.
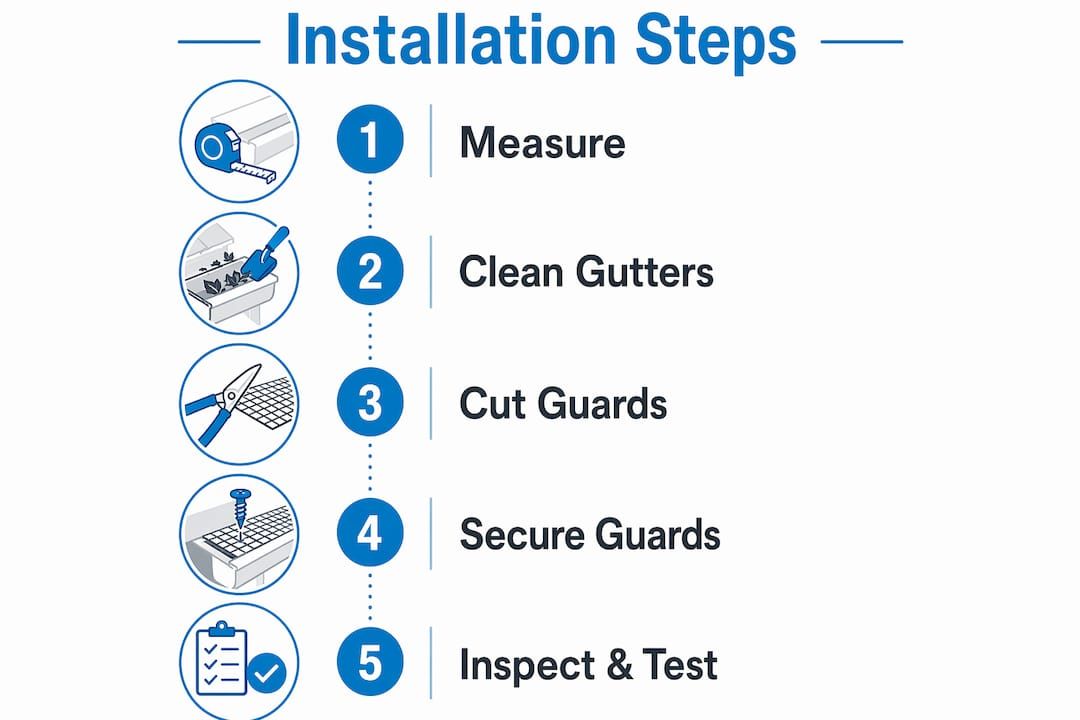
What are the step-by-step instructions for installing residential gutter guards?
With clean, properly sloped gutters and solid hangers, you are ready to install. Work from one end of the gutter to the other, section by section.
-
Measure the full gutter run. Use your measuring tape to record the total length of each gutter section. Note any corners, downspout openings, and irregular lengths that will need trimmed pieces.
-
Cut the first guard section to fit. If your gutter run does not divide evenly into 3- or 4-foot sections, cut the first piece to fill the gap at the starting end. Use tin snips for metal mesh or screen guards. Cut foam or brush inserts with a utility knife.
-
Position the first section. Slide the back edge of the guard under the first row of shingles if the product design calls for it. If not, rest the back edge against the fascia or inside the rear lip of the gutter. The guard should sit level with a slight slope matching the gutter's pitch toward the downspout.
-
Secure the front lip. Drive self-tapping screws through the front lip of the guard and into the outer edge of the gutter. Space screws every 18–24 inches to prevent the guard from lifting in wind or under the weight of wet debris.
-
Tighten screws just snug. Do not overtighten. Over-tightening screws can curl or buckle the guard, creating low spots where debris collects and water splashes over the edge instead of flowing through.
-
Overlap the next section. Place the second guard section so it overlaps the first by at least 0.5 inches. This overlap prevents gaps where pine needles, shingle grit, and small debris can sneak through.
-
Repeat along the full gutter run. Continue measuring, cutting, positioning, and securing each section. Check alignment every few sections to make sure the guards stay level and flush with the gutter edge.
-
Trim around downspouts and corners. Cut guards to fit cleanly around downspout openings. At inside and outside corners, miter the ends of two sections so they meet tightly without buckling.
A note on shingle attachment:
Some guard products are designed to slide under the first row of shingles. Others are not. Check your guard's design against your roof type before purchase. Forcing a guard under shingles that were not designed for it can crack brittle shingles and void your roofing warranty. When in doubt, use a fascia-mount or gutter-lip attachment method instead.
Pro Tip: Snap a photo of each completed gutter run before moving to the next. If a section shifts or leaks after a rainstorm, you will have a reference point showing exactly how it was installed.
What common mistakes should homeowners avoid when installing gutter guards?
Even experienced DIYers make these errors. Knowing them in advance saves you from redoing sections or, worse, paying for roof repairs.
- Attaching guards to shingles. Fastening guards to shingles risks voiding your roofing warranty. Always secure guards to the gutter itself or the fascia board only.
- Skipping the hanger inspection. Loose hangers cause gutters to sag under the weight of guards and trapped debris. Once guards are installed, hangers become hard to inspect or service. Fix them first.
- Over-tightening fasteners. Screws that are too tight deform the guard material. This creates ridges that collect debris and disrupt water flow.
- Choosing the wrong guard for your climate. Standard screen guards may not handle heavy rainfall. High-flow gutter guard systems are recommended for homes in heavy rain zones where typical screens fail under large water volumes.
- Ignoring gutter slope. Guards do not fix drainage problems. Verify slope and downspout function before installation, not after.
- Forcing guards under brittle shingles. Older shingles crack easily. If your shingles are stiff or granule-heavy, use a fascia-mount guard rather than a slide-under design.
"Gutter guards act as filters, not solutions to drainage issues. Verifying effective water flow beforehand is critical." — HammerHead Roofing
Pro Tip: If your home is surrounded by pine trees, choose a micro-mesh guard over a standard screen. Pine needles are thin enough to pass through wide-opening screens and will clog the guard from below.
Key takeaways
Proper preparation and correct fastening technique are the two factors that determine whether your gutter guard installation lasts years or fails after one season.
| Point | Details |
|---|---|
| Prepare gutters first | Clean, flush, and verify slope before placing any guard section. |
| Match guard type to climate | Use high-flow or micro-mesh guards in heavy rain or pine-heavy areas. |
| Fasten to gutters, not shingles | Attaching to shingles voids roofing warranties and risks shingle damage. |
| Space screws correctly | Drive fasteners every 18–24 inches and tighten just snug to prevent buckling. |
| Overlap every section | Maintain at least 0.5 inches of overlap between sections to block debris gaps. |
What I have learned after years of gutter guard installations
After working on hundreds of residential roofing and gutter projects across Northern California, I can tell you that the preparation phase separates a five-year installation from a one-season failure. Most homeowners want to skip straight to placing the guards. That impulse is understandable. But I have seen beautiful new micro-mesh guards installed over gutters with a half-inch of compacted sediment at the bottom, and they back up within months.
The warranty issue is the one that surprises people most. Homeowners assume that because they bought a quality guard, they are covered. What they miss is that their roofing warranty has its own terms, and sliding a guard under shingles the wrong way can void it entirely. I always recommend checking your roofing warranty terms before choosing a guard design, not after.
Climate matters more than most product marketing admits. A screen guard that works perfectly in Sacramento's dry summers will struggle in a wet winter with oak leaves and pine needles coming down fast. I have seen homeowners in foothills communities replace screen guards twice before switching to micro-mesh and finally solving the problem.
My honest advice: if your gutters are older, your hangers are questionable, or your roof is within a few years of needing replacement, call a professional before you install guards. Guards are not a fix for a failing gutter system. They are a maintenance reducer for a healthy one. Getting the foundation right first is always worth the time.
— Cesar
Get professional gutter guard installation from Shieldguardroofing
Shieldguardroofing is a family-owned roofing company serving Northern California with over 75 years of combined experience. The team handles everything from full residential roofing services to gutter guard selection and installation, using premium materials and proven techniques that protect your roofing warranty.

If you are unsure which guard type fits your roof, your climate, or your gutter condition, Shieldguardroofing offers professional assessments so you get the right solution the first time. Professional installation also means your guards are fastened correctly, your shingles stay intact, and your warranty stays valid. Reach out to Shieldguardroofing to schedule a consultation or get a quote for your gutter guard installation project today.
FAQ
What is the best gutter guard type for homes with heavy tree coverage?
Micro-mesh gutter guards are the best option for homes surrounded by trees, especially pines. Their fine mesh blocks small debris like pine needles and shingle grit that standard screen guards allow through.
How do I install gutter guards without voiding my roof warranty?
Fasten guards only to the gutter lip or fascia board, never to the shingles themselves. Attaching guards to shingles is a common warranty-voiding mistake that roofing experts consistently flag.
How many gutter guard sections does an average home need?
Most homes require roughly 200 linear feet of gutter guard coverage. Using standard 3- or 4-foot sections, that works out to approximately 50–65 sections for a full installation.
Can I install gutter guards myself, or should I hire a professional?
DIY installation is possible if your gutters are clean, properly sloped, and in good condition. If your gutters sag, your hangers are loose, or your shingles are brittle, professional installation protects both your roof and your warranty.
How often do gutters need cleaning after guards are installed?
Gutter guards significantly reduce cleaning frequency, but they do not eliminate it entirely. Plan to inspect and clean your gutters at least once a year, particularly after fall leaf drop or heavy storms.
Recommended